How To Make A Comic Strip With Dialogues On Any Topic
- 33582 Views
- GetLitt!
- June 13, 2019
- Expert Interviews List of Books Reading Hacks & Tips Writing Tips & Tricks
Today we have a special guest writer who is the ‘Group Art Director’ at Amar Chitra Katha. Yes, we’re talking about the talented Savio Mascarenhas! As an illustrator, avid graphic novel reader and creator, who better to talk about our topic of choice today. Savio has kindly agreed to write a blog on something many people are curious about – How to make a comic strip with dialogues on any topic! After reading this, you will learn how to make a comic strip step by step.
Take it away, Savio!

Hey Readers,
Welcome to the world of comics. Before we jump straight into our subject today, I would like to take you through a brief history of comics.
What is Comic Art?
Comic art is also known as sequential art, a series of drawings that tell a story. For ages, it has been a medium of communication and storytelling. Even before the advent of language or the spoken word, the early caveman used to scribble his adventures on the wall, thus making his acts of bravado known to his clan.
Many instances of cave art, dating back to thousands of years, have been discovered all around the world.
We, humans, have a tendency to learn and grasp a particular idea or thought if it is depicted graphically. Our brain has the amazing ability to store images and recall them, years down the line. So, it’s no wonder that this simple and effective way of storytelling has survived and flourished for generations. Today comic books and graphic novels are widely popular across all ages and genres.
Make A Comic Strip With Dialogues On Any Topic
Comics are used to tell a story. Like all great things in life – comics or visual storytelling starts with an idea, a thought which a writer would put down in words, in a narrative form. Given a topic, a writer will first create an outline of the story. Now let’s learn how to make a comic strip step by step and start making comic strips for students.
Step 1 – Creating a story idea for your comic book
Let us say the topic is “Fun with Friends”. As an example, I have written a short story on this topic in the narrative form below.
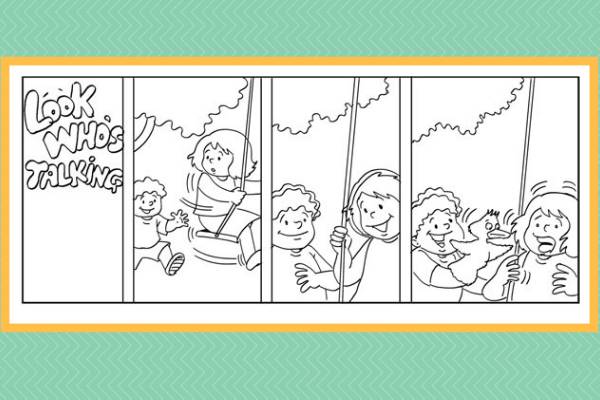
It’s morning, and a little six-year-old girl is playing on a swing in a park. Another kid walks along to the girl on the swing. Boy to the girl, “Hi, Sarah, my dad has got me a pet.” Sarah looks excited, “Wow…what is it?”
“It’s a duck, and you know it can speak too,” says the boy. “A duck that can speak?” asks Sarah, now looking curious. The boy brings out his hand that he had behind his back all the while, springing it up close to the girl’s face. It was a hand puppet of a duck! “Hi Sarah, I am Mr Doodle Duck”, the boy squawks out aloud.
Step 2 – Creating the panels
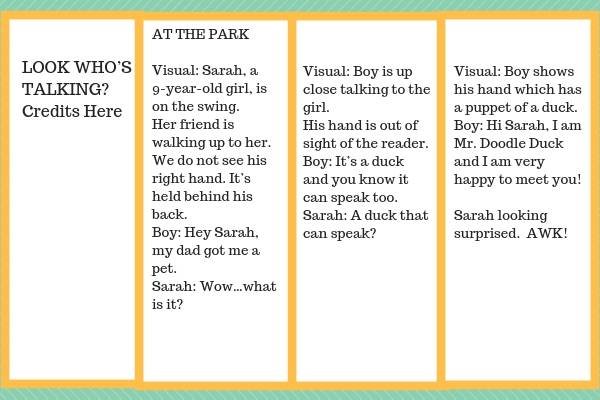
Now that we have a short story, we move on to making a comic script from it. Here we determine the number of panels you will need to tell the story, and the dialogues for the characters will be indicated. I use a grid format, shown below, that helps me to create the panels.
Step 3 – Time for the Drawing Board
Next, we move on the drawing board. There are two ways to go about this. There is the traditional way which is done on paper or the digital way using basic software, like Adobe Photoshop and Adobe Illustrator.
For those who want to do it the traditional way.
First, use a drawing paper you can get from a stationery shop. Second, based on the number of panels in our story, we will draw the boxes. In this example, we have four panels – the credits panel, which carries the name of the strip and the writer/ artist details, followed by the story. Third, pencil your art very lightly. As shown below:
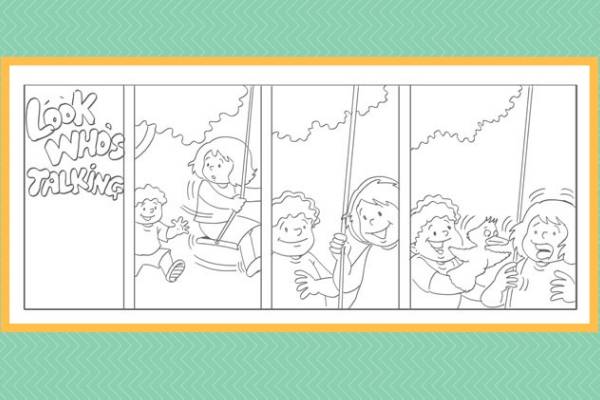
Once you are satisfied, you can then ink it using a micro tip pen, preferably black. So that it’s dark and clear, and will reproduce well after it is scanned.
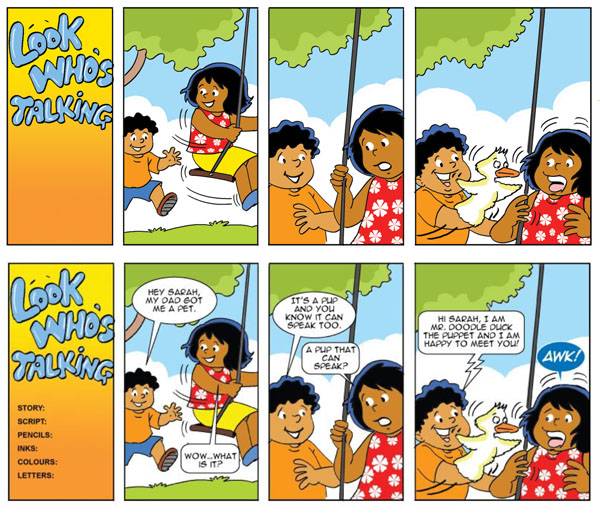
After you’ve done that – we finally come to the colours and letters. This is a process that can be done simultaneously. I have used Adobe Photoshop for the colours and Adobe illustrator for the letters. In an ideal situation, you would have a letterer and a colourist who would do this job.
The letterer would find a suitable font and speech bubbles to place in the strip. The colourist would be following the script to understand the mood of the story to fill in the colours. But you can do this all yourself with an understanding of fonts and colours.
Here is the final panel art coloured and lettered.
Don’t forget to read these useful tips!
1. Select fonts that are legible.
2. Speech bubbles should be placed ideally away from art. Try not to overlap important scenes in your picture.
3. See that the speech balloon pointers are appropriately placed.
4. There is enough “breathing space” between the text and the inside edge of the balloon.
5. Many artists use their own palette, a selection of colours, for colouring. So, they have uniformity in style and consistency. But there are no hard and fast rules; you are free to experiment.
6. Lastly, have fun while you are at it!
That’s how to make a comic strip!
Finally, you have learned how to make a comic strip step by step, and your comic strip is ready for print or if you want to share it online on any social media platforms. Today there are lots of opportunities for budding artists and writers to showcase their work on sites like Instagram, Facebook or Behance. It would be awesome if you have your own personal blog or you can start making comic strips for students.
So, what are you waiting for? Go out there and express yourself!
Like this?
Read: How to Write A Movie Review?
Read More: How to Write a Story Step-by-Step by Indian Author Katie Bagli

